Exercise 23 - Connecting a servo motor
1. INTRODUCTION
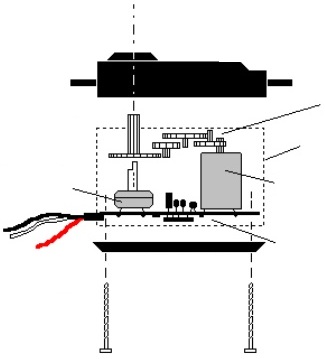
A servomotor is similar a DC motor but it has a reducer engine and a circuit of control to manage the angular position. Simplifying, the control circuit consists in a potentiometer, which rotates synchronously with the axis and, on the other hand, it has feedback.
Through control circuit, servo can read it own position. Following this principle, servo can rotate to any position and maintain it constant.
2. HOW TO CONNECT?
Materials:
· Arduino UNO board
· Protoboard
· Some wire Jumpers
· Servo motor
· potentiometer
Normally, Servos has three terminal power wire, ground and data (input/output). They can be connected to Arduino if not are too large, but you can use Arduino sensor shield or similar to connect it and simplify connections. This shield has a lot of 5V and GND terminals to connect three terminals sensors and servos. Despite the above, on this exercise schematic has been done without sensor shield.

On EXERCISE_A, only one servo is connected to pin 13 and a potentiometer is connected to analog pin A0.
On EXERCISE_B, two servos are connected to digital pins 12 and 13.
|
EXERCISE_A (Controlling with a potentiometer) |

|
|
EXERCISE_B (Control two servos by serial port) |

|
3. PROGRAMMING
On these exercises, it is necessary to include Servo.h library.
EXERCISE_A (Controlling with a potentiometer)
This program reads the value of a potentiometer and uses it to control the rotation of a servo.
#include <Servo.h>
Servo myservo; // create servo object to control a servo
int potpin = 0; // analog pin used to connect the potentiometer
int val; // variable to read the value from the analog pin
void setup() {
myservo.attach(13); // attaches the servo on pin 9 to the servo object
Serial.begin(9600);
}
void loop() {
val = analogRead(potpin); // reads the value of the potentiometer (value between 0 and 1023)
Serial.print("Pot value: ");
Serial.print(val);
Serial.print(" ");
val = map(val, 0, 1023, 0, 180); // scale it to use it with the
//servo (value between 0 and 180)
Serial.print("ServoRotation: ");
Serial.print(val);
Serial.println("*C");
myservo.write(val); // sets the servo position according to the scaled value
delay(15); // waits for the servo to get there
}
EXERCISE_B (Control two servos by serial port)
This program control a determinate number of servos up to twelve by serial communication.
#include <Servo.h>
Servo servo1; // create servo object to control a servo
Servo servo2; // twelve servo objects can be created on most boards
int input = 0;
int pos = 0; // variable to store the servo position
int servo = 0;
void setup() {
servo1.attach(13); // attaches the servo on pin 13 to the servo object
servo2.attach(12); // attaches the servo on pin 12 to the servo object
Serial.begin(9600);
servo1.write(0); // Writes position 0 degrees on servo1
servo2.write(0); // Writes position 0 degrees on servo2
}
void loop() {
if (Serial.available() > 0) {
// read the incoming byte:
input = Serial.parseInt();//You must introduce the degrees that you
//want the servo moves + the number of //servo
//e.g. input = 902 moves servo2 90 degrees
}
pos = input / 10; //Separate degrees from input
servo = input % 10;//Separate the number of servo from input
if (servo == 1) {
servo1.write(pos); // tell servo1 to go to position in //variable 'pos'
}
if (servo == 2) {
servo2.write(pos); // tell servo2 to go to position in //variable 'pos'
}
}
