Exercise 2 - Connecting a button
1. INTRODUCTION
Buttons are components with two states open/close. There are two types of buttons:
· NORMALLY OPEN

-Close circuit when you press it.
· NORMALLY CLOSE

-Open circuit when you press it.
2. HOW TO CONNECT?
Materials:
· Arduino UNO board
· Protoboard
· Some wire Jumpers
· 220 and 10K ohms resistors
· Button
· LED
Normally, buttons in Arduino have similar internal connections.

On the other hand, 1 and 2 are disconnected from 3 and 4 until button is pressed.
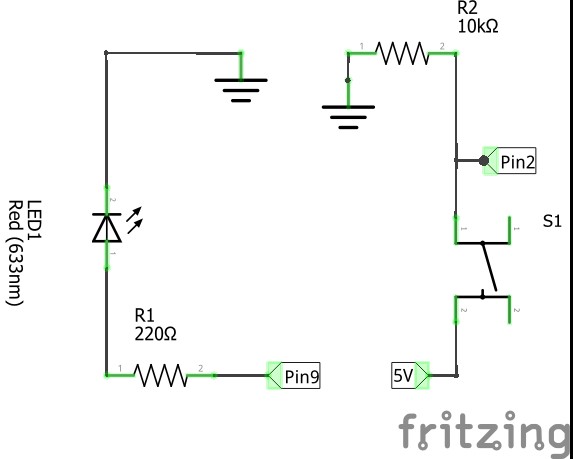
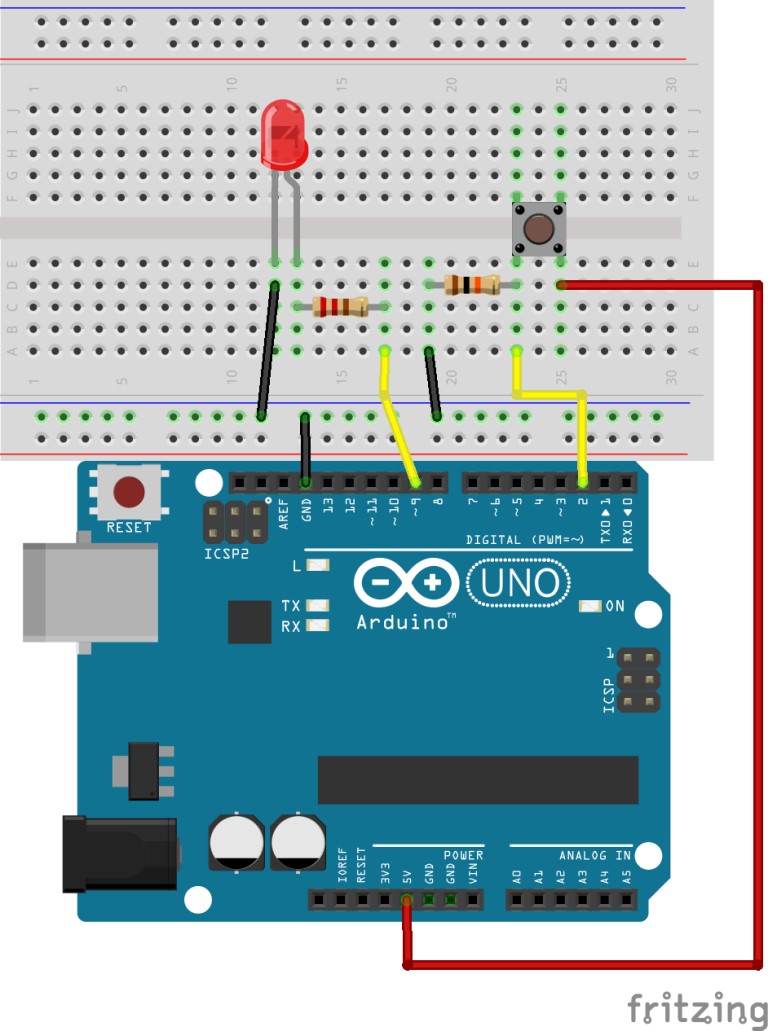
To read the button state from Arduino, you must create a breakdown voltage in button connecting it between 5V and GND (see in the diagram) connect it to digital pin in Arduino A0… A5.
WARNING:
You need to connect a resistor between Arduino board and button to avoid short circuit.|
EXERCISE_A (Turn on a LED) EXERCISE_B (Change between blink and fade)
|
|
|
3. PROGRAMMING
EXERCISE_A (Turn on a LED)
-This program is a modification from CONNECTING_A_LED_A. In this case, the LED only turns on if the button is pressed. The button should be associated to a digital pin (pin 2) and set as INPUT.
int led=9;
int button=2;
void setup(){pinMode(led,OUTPUT);//Set led pin as output
pinMode(button,INPUT);//Set button pin as input
}
-In loop part of the program button state is read by the function digitalRead(). It saves the result in ButtonStatevariable. Then, if() function write a HIGH level on LED if ButtonState equals HIGH and LOW level If not.
void loop(){int ButtonState=digitalRead(button);//Read button state
//If Button state is in high level, led will turn on
if(ButtonState==HIGH){digitalWrite(led,HIGH);
}
else{digitalWrite(led,LOW);
}
}
EXERCISE_B (Change between blink and fade)
-This program combines CONNECTING_A_LED_A with CONNECTING_A_LED_B using button to change between both of them.
-Setup part is the same that in the previous exercise.
int led=9;//Assign the name led to pin 9
int i=0;
int button=2;
void setup(){pinMode(led,OUTPUT);//Set led pin output
pinMode(button,INPUT);//Set button pin input
}
-Loop part is also similar but there, when ButtonState equals HIGH blink is executed. On the other hand, if ButtonStatenot equals HIGH fade is executed.
void loop(){int ButtonState=digitalRead(button);//Read button state
//If Button state is in HIGH level led blinking,
//Unless led will be in fade mode.
if(ButtonState==HIGH){digitalWrite(led,HIGH);//Write HIGH voltage level in led pin
delay(500);//Stop program 500 miliseconds
digitalWrite(led,LOW);//Write LOW voltage level in led pin
delay(500);
}
else{//for increments i , one on one
for(i=0;i<=255;i++){analogWrite(led,i);
delay(5);
}
//for decrements i , one on one
for(i=255;i>=0;i--){analogWrite(led,i);
delay(5);
}
}
}